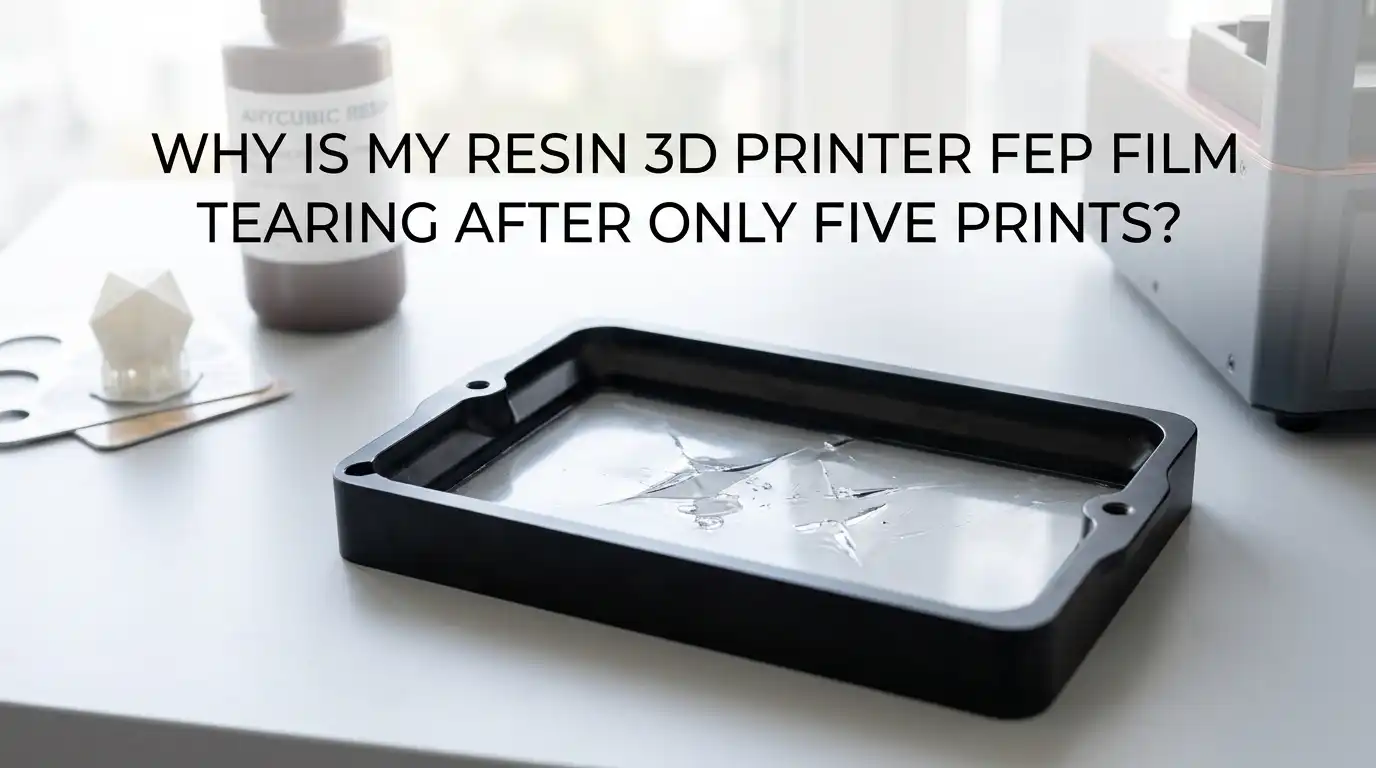
Why Is My Resin 3D Printer FEP Film Tearing After Only Five Prints?
If your resin 3D printer FEP film tears after only five prints, you are right to feel frustrated. That is not normal wear. It is usually a setup problem, a handling problem, or a print force problem.
The good news is that this issue is often easy to trace once you know where to look. In most cases, the film does not fail because it is weak. It fails because something sharp presses into it, or a print pulls on it too hard, layer after layer.
This guide breaks the problem into clear steps. You will learn how to check the vat, adjust settings, reduce suction, and protect the next sheet before you waste more resin, more time, and more patience.
In a Nutshell
- A torn FEP film after five prints usually means something is wrong, not worn out. Many printer guides treat FEP as a consumable part, but a fresh sheet should last far longer than a handful of jobs. If it tears this early, look for cured debris, poor tension, or a bad install first.
- Sharp cured resin is one of the biggest film killers. A tiny failed piece at the bottom of the vat can act like a nail. The next time the build plate lowers, that piece can press hard into the film and puncture it in one move.
- Peel force matters more than many users think. Large flat layers, hollow models without drain holes, fast lift speed, and low lift distance can all make the print yank hard against the film. That repeated pull can stretch, dent, and finally tear the sheet.
- Bad installation causes early failure. A new film needs even tension, clean screw channels, and correct screw order. Some support guides also remind users that new sheets often have clear protective layers on both sides. If one stays on, printing problems can start fast.
- Printer settings can either protect the film or punish it. Slower lift speed, enough lift distance, better bottom exposure, and correct leveling reduce stress on the vat. These changes take longer per print, but they usually save film, resin, and failed parts.
- Safe cleaning habits extend FEP life. Do not attack stuck resin with a metal scraper or your fingernail from the wrong side. Use the vat cleaning function if your printer has one, peel cured sheets gently, and filter resin after failures. Gentle handling often adds far more life than people expect.
What FEP tearing after five prints usually tells you
A torn FEP sheet after five prints is a warning sign. It points to force, debris, or bad setup. It rarely points to normal aging.
Many support guides treat visible light scratches as acceptable, but deep dents, punctures, clouding, or loose flex tell a different story. The film should survive far more than a short test run if the vat is clean and the print forces stay under control.
The key is to stop blaming the film first. Start by asking what hit it or pulled on it. A trapped cured chip can puncture it. A badly hollowed print can create suction and stretch it.
A loose install can let it flap and crease. If you solve the cause, the next sheet will usually last much longer.
Stop printing and inspect the vat before more damage spreads
The moment you suspect FEP damage, stop the next print. Do not run one more file just to test your luck. A small tear can become a resin leak fast.
Remove the vat, empty it safely, and inspect the film from both sides under bright light. Look for pinholes, dents, cloudy patches, wrinkled zones, and tiny cured bits stuck to the surface.
Then inspect the printer screen area too. If resin got below the vat, you need to clean that area before doing anything else. A quick check now can save the LCD later.
The simple rule is this. If the film has a puncture, replace it. If it only has light surface wear, keep checking the real cause before you install another sheet and repeat the same failure.
Find trapped cured resin and sharp debris before every new print
Small cured scraps are one of the most common reasons for sudden FEP damage. A failed support tip or loose cured flake can punch the film on the next layer.
The printer does not know that piece is there. It simply lowers the build plate again, and pressure builds at one point until the sheet gives up.
Get into a strict habit after every failed print. Pour the resin through a filter. Check the vat bottom with gloved fingers very gently from underneath, not by scraping the print side.
If your machine has a vat clean function, use it to create a thin cured sheet that lifts debris away. The pros of this method are safety and speed. The cons are a small resin cost and a few extra minutes, but those minutes are cheaper than a new screen.
Check for installation mistakes before blaming the printer
A new sheet can fail early if the install went wrong. That includes dirty frames, trapped resin in screw channels, uneven clamping, or the wrong side facing up.
One tiny mistake can create loose tension or a stress point. Some support manuals also note that brand new sheets may have very clear protective films on both sides, and they are easy to miss.
Take the vat apart and inspect the frame surfaces. Clean dried resin from every contact point. Make sure the sheet sits flat, with no twist and no wrinkle. If the film still has a protective layer on it, remove it before reinstalling.
The pros of a full reinstall are clear tension and fewer mystery failures. The cons are time and care, because rushed reassembly can make the same problem come back.
Set the right film tension and tighten screws in a smart order
FEP tension matters more than many users think. If the film is too loose, it flexes too much and can stretch or slam into debris. If it is too tight, it can stay under too much stress and wear faster.
Most support guides recommend using a spacer, jig, or even a cap of known height under the film during assembly so the sheet forms a slight bulge before final tightening.
Tighten screws in a diagonal pattern, not in a circle. Start at the corners, then move across the frame little by little. This spreads force evenly. A properly tensioned film should look smooth and taut, without wrinkles.
The pros of careful tensioning are better release and lower stress points. The cons are slower setup and a little trial and error, but correct tension often turns repeated failures into stable printing.
Reduce peel force by changing model orientation
Large flat layers create strong peel force. That force pulls the print from the film with every lift. If the pull gets too high, supports fail and the film takes extra stress.
A model placed flat or nearly flat to the build plate often creates the worst case because each layer presents a wide surface that sticks hard to the film.
Tilt the model so the cross section changes more gradually from layer to layer. This reduces the force of each peel step. You may need more supports, and the print may take longer, but the release becomes gentler.
Pros: lower suction, fewer support failures, and less film abuse. Cons: more supports, more cleanup, and longer job time. In most cases, the extra support work is still easier than replacing FEP every week.
Hollow big prints and place drain holes in the right spots
A hollow model without good drain holes can act like a suction cup. That vacuum effect can yank hard against the film and tear a print free from supports. It can also stress the FEP on every lift. Several slicer guides warn that holes need to sit low enough for resin and air to move out as the part lifts.
If the model is large, hollow it to reduce weight and cross section. Then add drain holes near the lowest points during printing, plus at least one higher path so resin can flow well.
Pros: less resin use, lower suction, lighter parts, and better support load. Cons: more prep time, visible hole repair later, and a cleanup step after curing. Still, for larger parts, hollowing with smart drain holes is one of the best ways to protect the film.
Slow lift speed and increase lift distance
Fast lift speed can turn every layer release into a hard jerk. That jerk transfers stress into the supports, the part, and the FEP.
If your film keeps tearing early, speed is one of the first settings to calm down. Support articles often suggest slower Z lift speed and enough lift distance so the part fully separates before the next layer starts.
Start with a moderate drop in lift speed, then test. If prints stick to the film or sound harsh during peel, increase lift distance too. Pros: smoother release, fewer broken supports, and less strain on the vat.
Cons: longer print times. That tradeoff is usually worth it. Saving one failed vat or one damaged screen cancels out many extra minutes of print time. Slow and steady often wins with resin printing.
Relevel the build plate and verify zero position
If the build plate is not level, one side can press harder into the vat than the other. That uneven pressure can hurt first layer adhesion and add stress to the film.
A bad zero position can also leave too much or too little squeeze at the start of a print. Both problems can cause sticking, failed bottoms, and more cured debris in the vat.
Relevel the plate from scratch. Clean the plate first. Follow your printer routine slowly, then lock the screws without shifting the plate. After that, confirm the zero position is correct.
Pros: stronger first layers, fewer failed starts, and less loose debris later. Cons: it takes a few minutes and can feel repetitive. Still, leveling is basic maintenance. If you skip it, you may chase random failures that all begin with one crooked setup.
Tune bottom exposure without overdoing it
Bottom exposure needs balance. Too little exposure can make the print stay on the film. Too much can make the base grip too hard and add stress later.
More exposure is not always the smart answer. Some printer guides suggest adding bottom exposure and extra bottom layers when parts stick to the film, but that should be a measured test, not a blind jump.
Change one setting at a time. If prints are not holding the plate, raise bottom exposure in small steps and watch the result. You can also add a raft for a wider, stronger base if the model allows it.
Pros: stronger start and fewer early failures. Cons: more elephant foot, harder part removal, and longer first layers. The goal is stable adhesion, not brute force.
Check resin temperature and give thick resin time to settle
Cold resin behaves differently from warm resin. It flows more slowly and can resist movement more. That extra drag can affect layer formation and release.
Thick resin may also need more time to settle after the plate moves. If exposure begins before the resin fully settles, you can see rough layers, weak adhesion, and odd stress on the print cycle.
Try to print in a stable room with resin at a healthy working temperature for your material. If your slicer allows rest time or light off delay, test a bit more time, especially on early layers.
Pros: cleaner layer formation and more stable starts. Cons: slightly longer print time and a need for patient tuning. Still, a warm, settled resin pool often makes the whole process calmer and easier on the film.
Clean failed prints without stabbing or scraping the FEP
Many FEP sheets die during cleanup, not during printing. A sharp tool on stuck resin can scratch or puncture the film in seconds.
That damage often looks like a printing problem, but it really happened by hand. If your printer has a vat clean feature, use it to create one thin cured sheet that lifts away small debris together.
Another safe method is to pour off the resin, clean gently, and remove stuck cured material by lifting from an edge with soft tools only. Use plastic tools if needed, never a metal scraper against the film.
Pros: much lower chance of accidental puncture. Cons: the process is slower than digging at the vat. Slow is better here. One impatient cleanup session can ruin a brand new sheet.
Know when the film is still usable and when it must go
Not every mark means the film is done. Light scratches and small smudges can still be okay. Deep dents, punctures, holes, severe clouding, and loose stretched film are the real stop signs.
Some guides also note that a used sheet can keep working unless the damage changes release or risks leakage.
A simple test helps. Hold the vat to bright light and inspect the center area carefully. If you see a hole, replace it. If you see deep damage where prints peel most often, replace it.
If the film flexes too much and feels loose, retension or replace it. The pros of replacing early are safety and cleaner prints. The cons are cost and downtime. The trick is to replace for real damage, not for small cosmetic wear.
Use this five print recovery plan to protect the next sheet
If you want the next FEP to last, do not change ten things at once. Use a simple five print recovery plan. That gives you clear proof of what actually fixed the issue.
Print one small test after reinstalling and leveling. Then test a second file with slower lift speed. Third, tilt the model more. Fourth, hollow any larger file and add drain holes. Fifth, filter resin and inspect the vat after the job.
Keep notes after each print. Listen for harsh peel sounds. Watch for loose supports, stuck bits, or cloudy spots in the same area. This method has strong pros because it gives clear answers fast. The only con is patience. But patience here pays off. Once you find the real cause, your printer becomes much easier to trust.
If your FEP keeps tearing after you work through these steps, the issue may come from a warped vat frame, damaged clamp surfaces, or a problem with the build plate motion. In that case, inspect the hardware closely before risking another sheet.
FAQs
How long should a resin printer FEP film usually last?
A FEP sheet should usually last much longer than five prints. The exact life depends on print size, settings, resin type, and handling. Small well supported prints may give you a long stretch of use. Large flat prints with high peel force can shorten that life fast. What matters most is damage type, not print count. If the film stays smooth, clear enough, and free from punctures, it may keep working well for many more jobs.
Can I keep using a scratched FEP film?
Yes, sometimes you can. Light surface scratches do not always ruin print quality. Many users replace film too early because they assume every mark is fatal. The real problem starts with deep scratches, dents, punctures, holes, or heavy clouding in the main peel area. If resin can leak, the film is done. If release gets worse or prints start failing in one spot, replacement is usually the safer choice.
Does PTFE lubricant fix FEP tearing?
It may help some sticking cases, but it is not the first fix for tearing. If your film tears after five prints, the bigger causes are usually trapped debris, bad orientation, wrong tension, or strong suction. A lubricant will not solve those root issues. Fix setup and force problems first. Use add on tricks only after the basic mechanical and slicer checks are done. Otherwise you may hide the real issue for one print and face the same tear later.
Why do my prints stick to the film instead of the build plate?
This usually points to weak first layer adhesion or high peel stress. Common reasons include poor leveling, wrong zero position, low bottom exposure, loose FEP tension, fast lift speed, and low lift distance. A cold or thick resin can also make the start less stable. The fix is usually a combination of better leveling and calmer release settings. Do not change everything at once. Test one change at a time so you can see what helped.
Should I replace the film after one puncture, even if it is tiny?
Yes. A puncture means the seal is gone. Even a tiny hole can let resin leak to the screen area, and that risk is much bigger than the price of a new sheet. Do not try to print through a puncture. It may seem fine for a short job, then fail badly without warning. Replace the sheet, clean the vat frame well, and then find the cause of the puncture before you start again.