How To Fix Smart Sprinkler Head Rotation Gear Stripping?
Your sprinkler head spins in circles but water sprays everywhere at once. Or worse, it stops rotating and just soaks one sad patch of grass. That frustrating problem often points to stripped rotation gears inside your smart sprinkler head.
Gear stripping happens when the tiny internal gears wear down or disengage. This is common in popular models like Rain Bird 3500, 32SA, Hunter PGP, and Orbit Saturn. The good news? You can often fix this yourself without calling a professional.
This guide walks you through spotting the problem heads first. You will learn how to use a simple flat-head screwdriver to adjust the pattern slot.
In a Nutshell
- Test your system first. Turn on each zone and watch every head. This helps you spot which sprinklers spray unevenly or spin oddly.
- Grab a flat head screwdriver. Use it in the pattern adjustment slot on top of the head. Gently tweak the spray pattern and rotation range.
- Clean nozzles and filters often. Dirt and debris cause clogs that strain the gears over time. A simple rinse can prevent bigger problems later.
- Check for severe damage. If gears look worn beyond repair, replacing the head is your best bet. Swapping a head only takes about five minutes.
- Avoid common mistakes. Never force the adjustment screw too tight. This single habit causes most gear stripping issues.
- Know your brand. Rain Bird, Hunter, and Orbit models often share similar gear designs. Understanding your specific model helps you fix things faster and correctly.
Understanding Gear-Drive Sprinkler Heads and Why Stripping Occurs
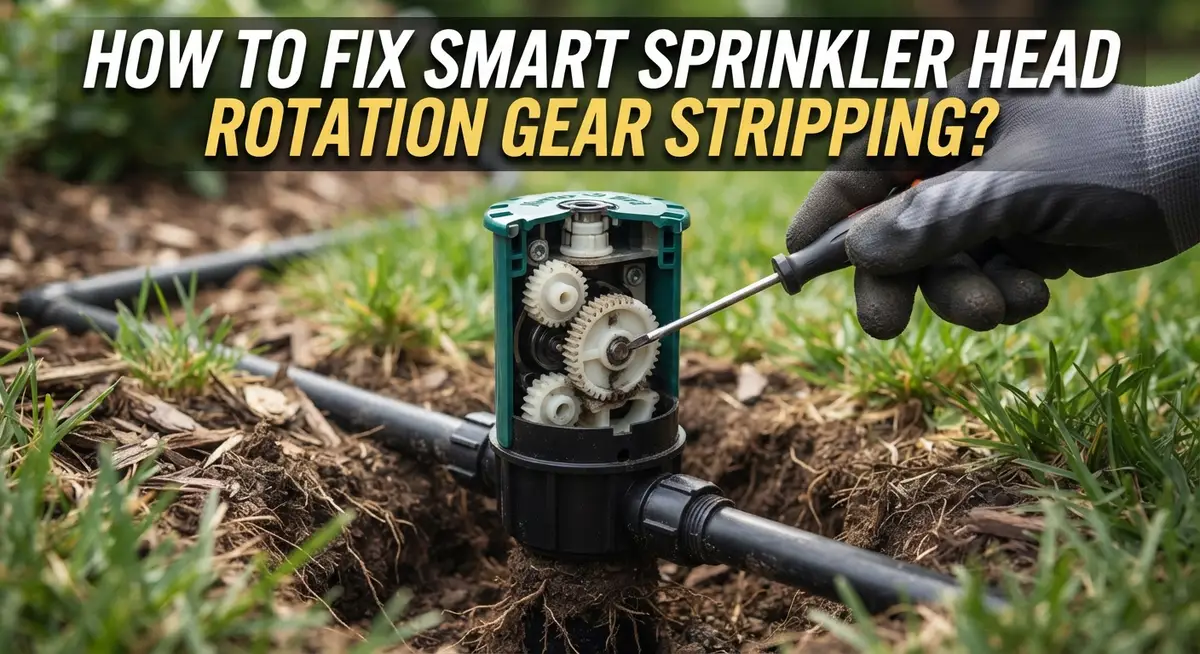
Gear drive sprinkler heads use internal gears to rotate and change spray patterns. These gears work together like a mechanical clock inside your sprinkler head. When you turn the adjustment dial, it tells the gears which direction to spin and how far to rotate.
Stripping happens when those gears lose their teeth or slip out of place. Think of it like a bicycle chain that jumps off the sprocket. Once the teeth wear down, the gears can no longer grip each other properly. Your sprinkler head then spins wildly without control or stops rotating altogether.
Several reasons cause gear stripping in smart sprinkler systems. Dirt and sand inside the head create friction that wears gears faster. Mineral deposits from hard water build up on the gear teeth and cause grinding. Over tightening the adjustment screw forces gears together too hard and damages them. Age and constant use naturally wear down the internal parts over time.
Common sprinkler brands use similar gear designs. Rain Bird 3500 and 32SA models have vulnerable gears. Hunter PGP heads and Orbit Saturn sprinklers share the same weakness. This means the problem affects many homeowners with standard irrigation systems.
Understanding how gear stripping happens helps you prevent it. Regular cleaning removes debris before it damages internal parts. Gentle adjustments protect the gears from unnecessary strain. Proper water pressure keeps the system running smoothly without forcing the mechanism.
Knowing your sprinkler head type matters too. Different brands use different gear sizes and materials. Some heads have stronger gears than others. This information helps you decide whether to repair or replace a damaged head later.
Signs Your Sprinkler Head Has a Stripped Rotation Gear
Your sprinkler head shows several clear warning signs when the rotation gear strips. Watch for these red flags during normal operation.
The most obvious sign is jerky or stuttering rotation. Your sprinkler head starts moving, then stops abruptly, then moves again in short bursts. This happens because the stripped gears cannot engage smoothly anymore. The head may also rotate only partially instead of completing its full sweep pattern.
Listen for grinding or clicking sounds coming from the head itself. These noises indicate gears are slipping or missing teeth. You might hear a loud grinding when the system pressurizes, or clicking sounds as the head tries to rotate. Normal operation should be nearly silent.
Check if your sprinkler head stays stuck in one position. A severely stripped gear prevents any rotation at all. The head points in a single direction and refuses to move, even when you manually try to adjust it. Water sprays in only one area instead of covering your intended zone.
Look for water spraying at odd angles or inconsistent patterns. When gears slip, the head cannot maintain proper spray direction. You might see water hitting sidewalks, driveways, or neighbors’ yards instead of your lawn.
Leaking water from the top of the head also signals internal gear damage. Pressure builds up inside, and broken gears create gaps where water escapes.
Test each head by turning on your system zone by zone. Observe how each sprinkler rotates and sprays. Compare problem heads to ones working correctly. This comparison helps you identify exactly which heads need attention before attempting any repairs or replacements.
Tools You’ll Need Before You Start
Before you start fixing your smart sprinkler head, gather the right tools. Having everything ready saves time and prevents frustration when you’re working on your system.
A flat head screwdriver is your most important tool. You’ll use it to adjust the pattern slot on top of the sprinkler head. Make sure it fits snugly without being too large or too small.
You’ll also need a Phillips head screwdriver. Some sprinkler heads have different screw types, and you want to be prepared for either one. This prevents stripping screws while you work.
Grab a small brush or old toothbrush. Clogged nozzles and filters cause gear strain that leads to stripping. A brush removes dirt and debris quickly without damaging delicate parts.
Keep a bucket of clean water nearby. You can rinse away dirt from the nozzles and check water flow while testing your repairs. This helps you spot clogs that strain the gears.
A flashlight or headlamp makes a huge difference. Sprinkler heads are small, and you need to see inside them clearly. Good lighting helps you spot gear damage and worn teeth.
Wear work gloves to protect your hands. You’ll be handling small metal parts and working near water spray patterns. Gloves also give you better grip on tiny screws.
Finally, have a replacement head nearby just in case. If the gears are severely stripped, repair won’t work. Knowing you have a backup lets you proceed without worry.
These simple tools handle most gear stripping fixes. You probably own most of them already in your garage or kitchen drawer.
Step-by-Step Guide to Diagnosing the Problem Head
Start by turning on your sprinkler system and running each zone one at a time. This helps you spot which heads have problems. Watch for heads that don’t rotate smoothly or stay stuck in one spot.
Listen carefully while each zone runs. Grinding or clicking sounds come from heads with damaged gears inside. These noises tell you exactly which sprinklers need attention. Jerky, stuttering rotation is another red flag to listen for.
Look at the spray pattern from each head. Water spraying at odd angles or missing sections means the rotation gear isn’t working right. Normal heads should water in a smooth, consistent arc. Heads that spray in random directions have internal damage.
Check if water leaks from the top of the sprinkler head. This leak often signals that gears have stripped and internal parts are misaligned. Leaking water means water pressure is escaping where it shouldn’t.
Use a flat head screwdriver to gently turn the pattern adjustment slot on each head. The head should rotate smoothly with light pressure. If it feels stuck, grinding, or won’t move at all, the gears are likely stripped.
Inspect the nozzle area for debris or clogs. Sometimes dirt blocks the gear from moving freely, which feels like stripping but isn’t. A clogged filter upstream can cause this same problem.
Write down which heads show problems. This list helps you track what needs repair or replacement. Take photos or videos of the bad heads rotating so you remember exactly what you saw.
How to Adjust and Repair Minor Gear Rotation Issues
Once you’ve identified which sprinkler heads have gear problems, you can start making adjustments. The key is working slowly and carefully to avoid making things worse.
Start with the pattern adjustment slot. This is the small slot on top of your sprinkler head. Use a flat head screwdriver and turn it gently. You should feel slight resistance as you rotate it.
Turn the slot to adjust your spray pattern. Most heads let you narrow or widen the spray arc. This simple adjustment often fixes minor rotation issues caused by the head being stuck in one position.
Clean the nozzle area next. Use your small brush or old toothbrush to remove any dirt, sand, or debris around the nozzle opening. Clogged nozzles force the internal gears to work harder, which causes stripping.
Check your filter screen if your system has one. A clogged filter restricts water flow and puts extra strain on the rotation mechanism. Clean it by rinsing with fresh water.
Test your adjustment by running the zone again. Watch the spray pattern. The head should rotate smoothly without jerking or grinding sounds.
If the head still doesn’t rotate after these adjustments, the internal gears are likely damaged beyond simple fixes. Don’t force the adjustment screw. Over tightening makes stripping worse and can break the internal shaft.
Take notes on which adjustments worked for which heads. This helps you avoid the same problems in the future. Consistent maintenance and gentle adjustments keep your rotation gears healthy and working properly.
When and How to Replace a Severely Stripped Sprinkler Head
When your sprinkler head has severe gear damage, replacement is your best option. Internal gears that are completely stripped cannot be repaired with simple adjustments or cleaning. You’ll need to remove the old head and install a new one.
Start by turning off your system. This prevents water from spraying while you work. Locate the affected sprinkler head and mark it clearly so you don’t forget which one needs replacement.
Use a flat head screwdriver to gently pry up the sprinkler head from its base. Most heads sit in a socket that allows easy removal. Twist the head counterclockwise while pulling upward. The entire head should come free within seconds.
Clean the socket before installing the new head. Remove any dirt, sand, or debris from the opening. A small brush works well for this task. Rinse the socket with clean water and let it dry completely.
Insert your new sprinkler head into the socket. Push it down firmly until you hear or feel a click. The head should sit level with the ground. Twist it clockwise until it’s snug, but don’t over tighten.
Run your system to test the new head. Watch the spray pattern during the first cycle. The head should rotate smoothly without stuttering or stopping. Check for any water leaks around the base.
Adjust the spray pattern as needed. Use your flat head screwdriver in the pattern adjustment slot. Set the rotation range to match your lawn’s needs. Most replacement heads perform like new units right away.
The entire replacement process takes about five minutes per head. This quick fix restores full rotation and prevents water waste from malfunctioning sprinklers.
Preventing Future Gear Stripping Through Maintenance
Regular maintenance stops gear stripping before it starts. The key is catching small problems early, before they become major damage.
Check your system monthly during the growing season. Turn on each zone and watch how your sprinkler heads rotate. Listen for grinding sounds or stuttering movements. These noises mean gears are already struggling. Stop using that zone and plan repairs soon.
Clean your filter screen every two weeks. A clogged filter forces your sprinkler head to work harder. Extra pressure damages internal gears faster. Simply remove the filter and rinse it with clean water. This single step prevents most gear problems.
Inspect nozzles for debris regularly. Sand, dirt, and grass clippings jam the spray mechanism. When the nozzle gets stuck, your head strains to rotate. Use a small brush to clean around the nozzle opening. Clear any visible blockages you find.
Avoid over tightening adjustment screws. When you adjust spray patterns, turn the slot gently. Stop as soon as you feel resistance. Forcing the screw strips the internal gears immediately. Gentle adjustments keep gears intact.
Store your system properly during winter. Drain all water from lines before freezing weather arrives. Ice expands inside pipes and gears, causing damage. Proper winterization protects your equipment for years.
Keep your lawn clear around heads. Mowing debris can jam sprinkler mechanisms. Trim grass and weeds away from each head. This simple habit prevents clogs and rotation problems.
Following these maintenance steps means fewer repairs and longer lasting sprinkler heads. Prevention always costs less than replacement.
Common Mistakes to Avoid During Repair
Gear stripping happens fast when you make common mistakes during repair. Understanding these errors helps you fix your sprinkler head without causing more damage.
Over tightening adjustment screws is the biggest mistake people make. When you turn the pattern adjustment slot, use gentle pressure only. The slot controls your spray direction and rotation range. Forcing it too hard strips the internal gears immediately. Think of it like turning a door knob. You apply steady pressure, not aggressive force.
Ignoring clogged filters and nozzles ranks as mistake number two. Many people assume the gears are broken when really the head is just stuck. A blocked filter makes your sprinkler work harder than it should. This extra strain damages gears faster. Always clean your filter screen before attempting any repairs.
Never attempt repairs on severely damaged gears. If your head doesn’t rotate after cleaning and gentle adjustments, replacement is better than repair. Forcing a damaged gear causes more problems. You might crack the head body or break the socket connection.
Skipping the initial inspection causes wasted time. Turn on your system first and watch which heads fail to rotate. Identify the exact problem before you grab your tools. Some heads stop rotating due to debris, not gear damage.
Rushing through adjustments leads to mistakes. Take your time when working with the pattern adjustment slot. Make small turns and test after each adjustment. This approach prevents accidental stripping.
Finally, avoid working on wet heads. Water makes it hard to see what you’re doing and increases slipping risks. Let the area dry first, then work carefully. These simple precautions keep your repair project successful.
Final Thoughts
Fixing a stripped sprinkler head does not need to feel hard. Most rotation problems come from dirt, debris, or gentle wear.
You now know how to spot the signs early. A head that sticks, spins wrong, or stops rotating tells you something is off.
Small fixes solve most problems. Cleaning nozzles and filters often restores smooth rotation. A gentle screwdriver adjustment can fix minor gear issues too.
Sometimes, though, gears wear beyond repair. When that happens, replacement is your best path forward. Swapping a head takes only about five minutes.
Regular checks save you time and money. Watch your system during each growing season. Catch small issues before they turn into bigger headaches.
Avoid rushing through any repair. Take your time with each adjustment screw. Gentle turns protect the gears inside your sprinkler head.
Remember that clogged filters strain your entire system. Clean screens every two weeks during active months. This simple habit prevents most gear stripping problems.
Your sprinkler system works best with consistent care. Skipping inspections leads to bigger repairs later. A few minutes of attention now saves hours later.
Winter storage matters just as much as summer maintenance. Drain your lines before freezing weather hits. This step protects gears from ice damage.
Every sprinkler brand faces similar gear stripping risks. Rain Bird, Hunter, and Orbit models all share this issue. Knowing your specific model helps you fix problems faster.
Trust your instincts when heads act strange. If cleaning and adjusting do not help, replacement makes sense. Your lawn deserves working sprinklers all season long.
Stay consistent with checks and cleaning. Your system will reward you with reliable rotation for years.
Frequently Asked Questions
What causes gear stripping in smart sprinkler heads?
Gear stripping happens when internal gears wear down or slip out of place. Water pressure pushes the rotor to spin, but worn gears can’t handle the force. Sand and debris get stuck inside the head and jam the mechanism. Over tightening adjustment screws also damages gears quickly. When gears strip, your head stops rotating or spins only halfway.
How do I know if my sprinkler head has a stripped gear?
Watch your sprinkler heads during watering. A stripped head will stop mid rotation or not turn at all. You might hear grinding sounds when the system runs. Some heads rotate backward instead of forward. The spray pattern becomes uneven or covers the same area twice.
Turn on each zone individually and observe every head. This helps you spot problem heads fast.
Can I fix a stripped gear myself?
Yes, you can fix many stripped gear problems without replacing the head. Start by cleaning the nozzle and filter screen thoroughly. Debris often causes gears to slip. Next, use a flat head screwdriver to gently adjust the pattern slot. Turn it slowly and test the rotation.
If your head rotates smoothly after cleaning and gentle adjustments, the problem is solved. Never force the adjustment screw. If the head still doesn’t rotate, the gears are likely too damaged for repair.
When should I replace a sprinkler head instead of repairing it?
Replace the head if gears are severely worn or broken inside. You’ll notice the head doesn’t respond to any adjustment attempts. Replacement takes about five minutes per head. If cleaning and gentle adjustments don’t work, replacement is your best option.